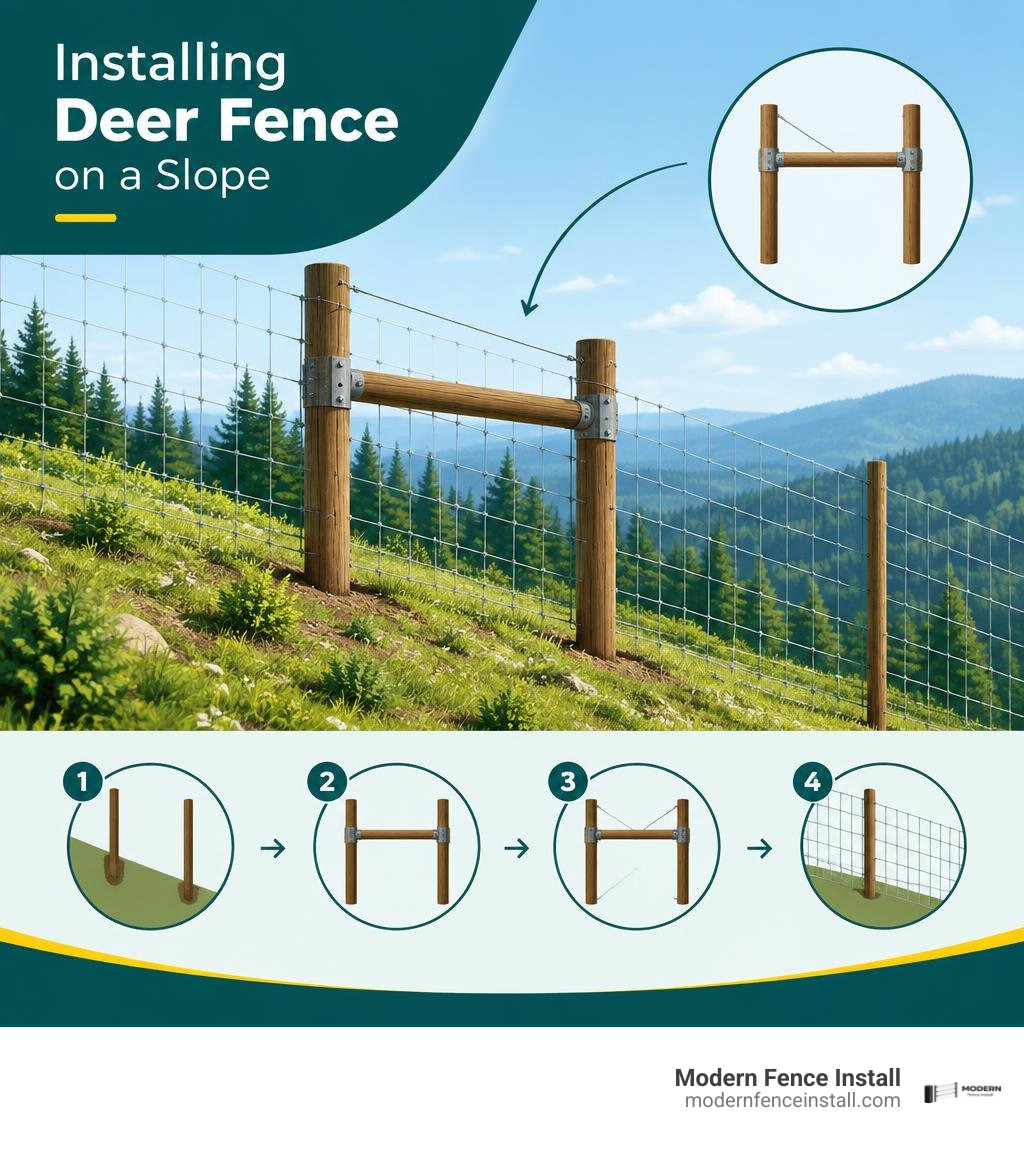
Core Principles for Installing Deer Fence on a Slope
Successfully installing deer fence on a slope requires setting vertically plumb posts parallel to the natural grade, reinforcing tension with hillside H-brace assemblies, pulling flexible mesh taut across high-tensile support cables, and staking a flared bottom apron to seal irregular ground gaps. Because adult white-tailed deer can leap 6 to 7 feet from a standstill—and even higher when launching from an uphill advantage—the finished barrier must maintain an 8-foot minimum height continuously relative to the sloped terrain.
When configuring a fence over uneven ground, installers generally select from three core structural methods, as detailed in this breakdown on methods for installing a fence on a slope:
| Method | Best Slope Range | Typical Materials | Pros | Cons |
|---|---|---|---|---|
| Racking (Contouring) | Gentle to moderate (0°–20° / up to ~20% grade) | High-tensile poly mesh, woven wire, chain link | Continuous barrier, no bottom gaps, clean visual line | Puts diagonal stress on rigid materials; mesh squares shear slightly |
| Stepping | Steep to severe (20°+ / >20% grade) | Rigid panels, framed hog wire, ornamental metal | Keeps top rails perfectly level; easy to install rigid panel systems | Leaves triangular bottom gaps that require kickboards or aprons; requires taller downhill posts |
| Continuous Contouring | Irregular, undulating terrain | Flexible poly mesh with top/bottom tension cables | Perfectly hugs ground dips and humps without custom framing | Can result in an organic, wavy top line if grade fluctuates wildly |
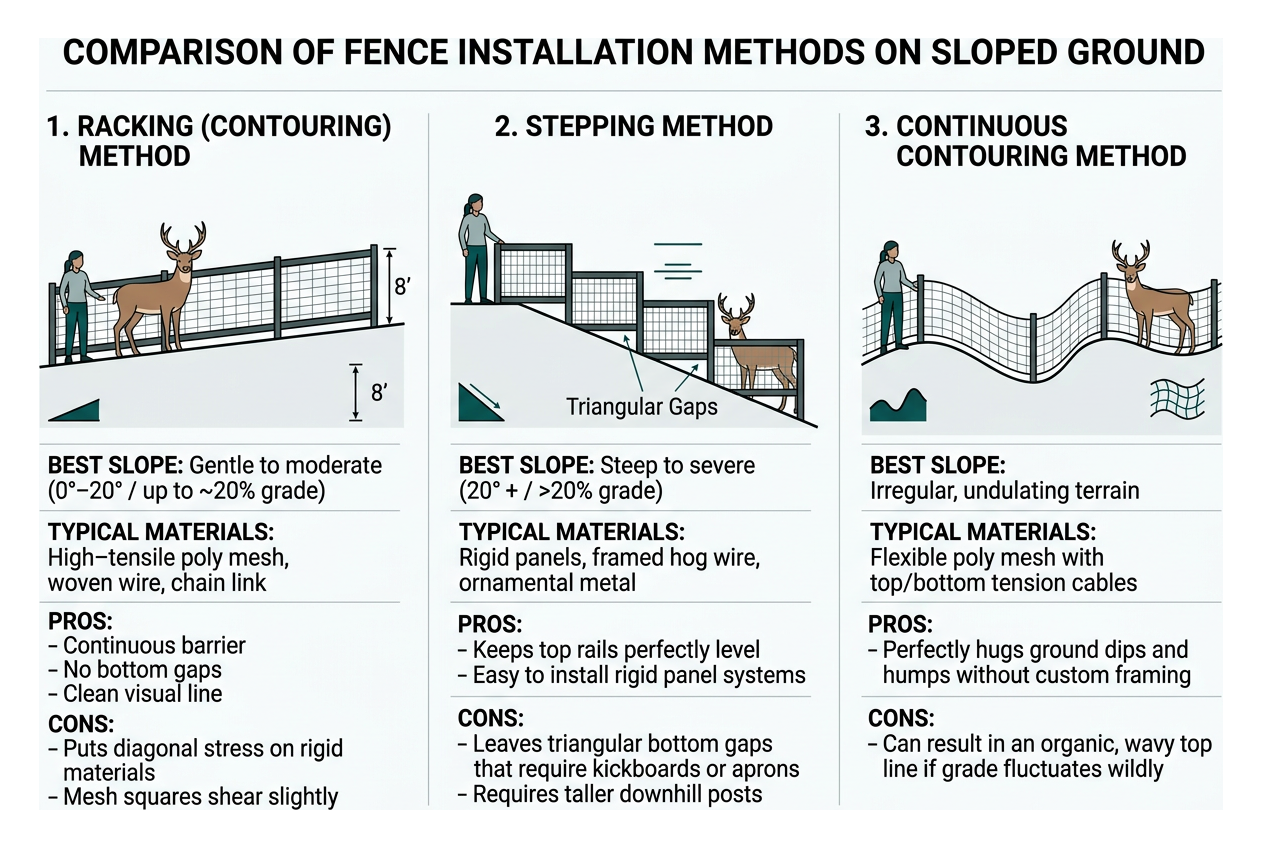
Parallel to Grade vs. True Level Alignment
A frequent point of confusion is whether the top of the fence should stay strictly level (horizontal with the horizon) or run parallel to the ground surface. For deer fencing, running the top parallel to the overall grade is almost always superior.
Forcing an 8-foot fence to remain level across a continuous hillside requires stepping down the posts every few feet. This creates stair-stepped panels with massive triangular voids underneath. On a downward slope, a stepped fence also reduces your effective jumping protection at the step-downs. By following the natural grade in long, smooth sweeps, the fence maintains a uniform 8-foot clearance at every single point along the run. It eliminates awkward optical distortion and distributes structural tension smoothly along the boundary line.
Choosing the Right Deer Fence Materials for Slopes
Material selection dictates how easily your fence adjusts to grade changes without buckling:
- Low-Profile Polypropylene Mesh: Highly flexible and UV-stabilized, high-strength poly mesh is one of the best choices for sloped properties. It can be racked and pulled across rolling contours without kinking, maintaining a nearly invisible profile in wooded settings.
- High-Tensile Steel Wire & Cable: Using high-tensile top and bottom support cables provides the backbone needed to keep mesh from sagging downhill.
- Woven Wire (Fixed Knot): Excellent for agricultural boundaries on slopes. The wire joints can pivot slightly, allowing the roll to follow gentle hills without warping.
- Welded Wire: Rigid welded wire does not stretch or shear easily. Forcing welded wire along a slope often causes unsightly bulges and wrinkles. If you use welded wire on uneven land, you must cut individual sections or terrace the line to prevent metal fatigue.
Balancing mesh strength with slope adaptability is key to estimating overall project investments; explore our guide to deer fence cost factors to see how terrain impacts material budgets.
Post Setting and Bracing Techniques on Uneven Hillsides
A sloped fence line experiences continuous lateral and downward gravitational forces. Without proper post depth and robust terminal bracing, downhill posts will slowly lean over time, resulting in loose, sagging mesh.
The golden rule for post setting on hills is the one-third burial rule: at least one-third of the total post length must be buried below ground, measured strictly from the downhill side of the hole. For an 8-foot finished deer fence on a slope, this typically means using 11- to 12-foot posts set 36 to 42 inches into the earth. Crucially, all posts must be set vertically plumb, using a level or plumb bob. Never angle posts perpendicular to the slope, as this severely compromises structural resistance against wind and tension loads.
Installing H-Braces on Sloping Terrain
End posts, corners, and major grade transitions bear the entire pulling force of your tensioned wire. On sloped ground, standard flat-land bracing will fail if the internal forces are misaligned.
When building an H-brace assembly on a hill:
- Set two heavy-duty terminal posts 8 to 10 feet apart along the slope.
- Install the horizontal cross-member parallel to the ground grade, matching the slope angle rather than leveling it against the horizon. This keeps the brace geometry aligned with the pull of the wire.
- Secure the cross-member using 3/8-inch smooth steel brace pins or rebar pins drilled into the posts.
- Run a diagonal high-tensile brace wire from the top of the downhill post down to the base of the uphill post. Keep this diagonal angle between 30° and 45° to prevent the brace from exerting upward lifting leverage on the uphill post.
- Tighten the diagonal wire using an in-line strainer or twitch stick until the entire assembly forms a rigid, immovable truss.
Anchoring Posts in Rocky or Steep Soil
Rocky hillside soil can turn manual digging into a grueling chore. Depending on your soil profile, choose an anchoring method that prevents erosion and frost heaving:
- Compacted Crushed Stone & Soil: In stable ground, backfilling posts with layers of crushed stone and soil—tamped firmly every 6 inches—provides strong friction and drainage without the need for heavy concrete mixing on a hillside.
- Crowned Concrete Footings: When using fast-setting concrete on a slope, ensure the top of the footing is sloped (crowned) above grade so water runs away from the post base, preventing rot and soil erosion on the high side.
- Heavy-Duty Steel Ground Sleeves: For rocky terrain, driving heavy-gauge galvanized steel ground sleeves with an extra-long post pounder allows you to set sturdy steel posts securely without digging massive footings.
Step-by-Step Guide: Installing Deer Fence on a Slope
Properly tensioning mesh along an incline requires a systematic approach to prevent sagging and misaligned lines. We follow a refined fence installation workflow to guarantee lasting stability on complex topographies.
Step 1: Surveying and Calculating the Drop
Before setting posts, map out the elevation profile of your fence line:
- Drive wooden stakes at the start and end of each straight slope run.
- Run a mason's string line between the stakes and attach a line level.
- Measure the vertical distance (rise) from the level line to the ground at the bottom stake, and the horizontal distance (run).
- Identify major contour breaks (crests or gullies). Plan to place a post at every high peak and low dip along the line to prevent the tensioned fence from lifting off the ground or cutting across ravines.
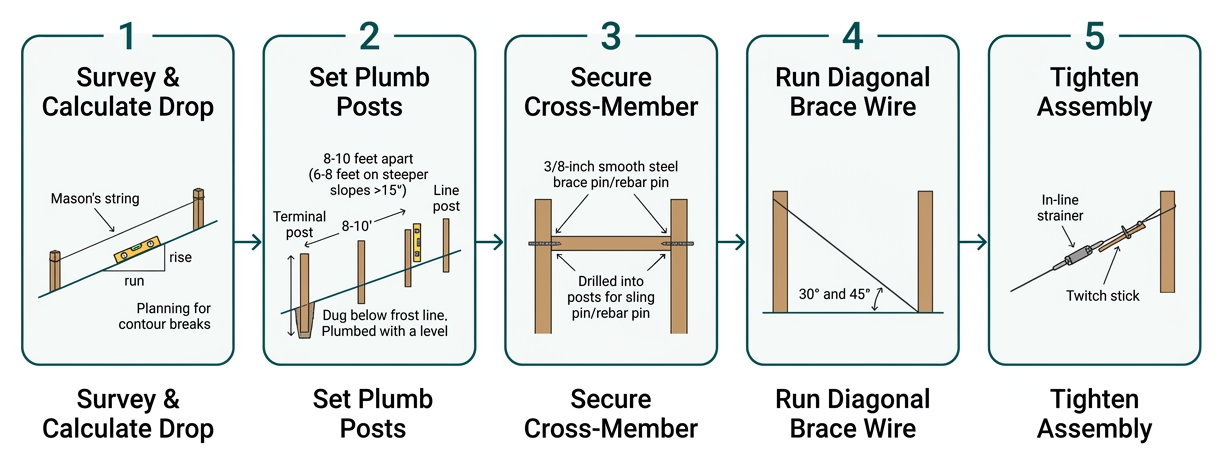
Step 2: Setting Plumb Posts Along the Hillside
- Mark Spacing: Space intermediate line posts 8 to 10 feet apart. On steeper inclines (>15°), reduce post spacing to 6 to 8 feet to provide better control over ground contouring.
- Excavate Holes: Dig post holes measuring from the low side of the slope. Ensure holes go well below your regional frost line (typically 30–36 inches in northern climates).
- Set Terminal & Line Posts: Erect your corner and end H-brace assemblies first. Plumb all posts with a post level. Backfill and thoroughly tamp each hole. Let any concrete cure fully before applying tension.
Step 3: Tensioning and Attaching Wire Mesh
Tensioning an 8-foot roll of mesh on a hillside cannot be done by hand pulling alone:
- Install Guide Wires: Run a 12.5-gauge high-tensile steel wire along the very top of your posts and another 2 to 3 inches above the ground. Tighten these with ratchet strainers until they ring like guitar strings.
- Unroll the Mesh: Roll out the deer fence along the uphill side of the posts.
- Anchor the High End: Secure the mesh firmly to the top uphill terminal post using heavy-duty industrial staples or cable ties.
- Attach a Pull Bar: Clamp a 2x4 wooden clamp bar or steel tensioning pipe vertically across the entire 8-foot height of the mesh at the downhill end.
- Apply Gradual Tension: Hook a heavy-duty come-along winch to the pull bar and anchor it to the downhill corner post (or a vehicle/tree anchor further down). Slowly crank the winch, pausing to walk the line and manually adjust the mesh so it slides evenly past intermediate posts without snagging.
- Fasten to Posts & Cables: Once taut, fasten the mesh to the top and bottom tension cables using hog rings spaced every 12 to 18 inches, then attach the mesh to each line post with heavy-duty UV-rated ties.
Eliminating Gaps and Securing the Fence Bottom
The bottom edge of a hillside deer fence is its most vulnerable point. Deer are opportunistic foragers; if they encounter an 8-foot barrier, their first instinct is often to test the perimeter for low spots, attempting to push their heads underneath undulating ground.
To permanently close bottom gaps on uneven hillsides:
- Create a Ground Apron (Flare): Rather than trimming the fence flush with the ground, buy mesh that is 6 to 12 inches taller than your post line (e.g., a 9-foot roll for an 8-foot fence). Flare this extra material horizontally along the ground facing outward toward the deer approach.
- Drive Ground Anchors: Secure the bottom cable and mesh flare using 12- to 18-inch heavy-duty J-hook or kinked rebar ground stakes spaced every 2 to 4 feet. In rocky terrain, use steel ground staples driven deep into the subsoil.
- Trench Minor High Spots: Instead of cutting your wire over small earth humps, slice a narrow 2- to 4-inch turf channel with a spade and bury the bottom tension wire directly into the soil.
- Install Kickboards in Deep Gullies: For sharp depressions where the fence cannot be pulled flush, bridge the gap with treated 2x8 ground-contact timbers (kickboards) or extra framed wire skirts anchored to the main line posts.
Explore our completed slope installations to see clean examples of ground-flared mesh on rugged hillsides.
Common Mistakes to Avoid When Installing Deer Fence on a Slope
A few critical oversights during layout can ruin an otherwise solid fence:
- Measuring Height from the Uphill Side: Always measure your required 8-foot clearance from the grade on both sides of the post. If deer are standing uphill on a 20% slope, an 8-foot fence measured from the ditch side may only provide 6 feet of physical clearance from their leaping stance.
- Tilting Posts with the Slope: Setting posts perpendicular to a hillside looks sloppy and weakens the fence’s ability to withstand horizontal tension and wind loads. Posts must always be vertically plumb.
- Ignoring Surface Runoff and Drainage: Hillsides channel heavy rainwater. If you block natural swales with solid boards or allow runoff to pool around concrete post bases, soil erosion will quickly wash out your post footings. Always crown concrete tops and use gravel backfill in drainage zones.
- Over-Spanning Dips and Swales: Running wire straight over a natural valley without anchoring it with a low-point post will leave a large gap underneath that deer will crawl through within days.
- Trimming the Wire Along Grade Dips: Never cut diagonal slits in your main mesh roll to match minor ground undulations. Cutting the mesh severs the continuous horizontal tension strands, destroying its tensile strength.
Frequently Asked Questions About Installing Deer Fence on a Slope
Should the top of a deer fence be level or parallel to the slope?
For continuous mesh and wire deer fencing, the top should run parallel to the natural slope grade. This ensures an uninterrupted 8-foot vertical barrier above every point along the ground, prevents large triangular bottom gaps, and keeps tension balanced along the fence line.
How do you prevent deer from crawling under a fence on uneven terrain?
To stop deer from pushing under the fence, flare 6 to 12 inches of mesh outward along the ground at the base. Anchor this flare tightly to the earth using 12- to 18-inch steel J-hook ground stakes spaced every 2 to 4 feet, and pin the bottom to a high-tensile bottom guide wire.
What is the maximum slope angle for racking a deer fence?
Flexible polypropylene deer mesh and woven wire can comfortably rack along slopes up to 15° to 20° (roughly a 25%–35% grade) without requiring custom panel cuts. For hills steeper than 20°, consider shortening post spans to 6 feet or transitioning to specialized stepped panel assemblies with dedicated bottom skirts.
Conclusion
Installing a secure, attractive deer barrier across sloped land requires thoughtful geometry, plumb post alignment, and rock-solid ground anchoring. By following the natural grade with flexible high-strength mesh, reinforcing your terminal posts with balanced H-braces, and securing the bottom flare against crawling wildlife, you can establish a reliable, nearly invisible perimeter that lasts for decades.
At Modern Fence Install, our engineered non-electric steel-cable and low-profile mesh systems provide discreet, robust containment across challenging terrains throughout CT, NY, and MA. If you are planning a perimeter project on uneven ground, explore our professional deer fence installation services or submit your project details to compare fence estimates and options with our team.